The Application Gateway v2 has considerable advantages over the v1. Support for autoscaling, zone redundant operation or use as an ingress in the AKS are just a few features from the list.
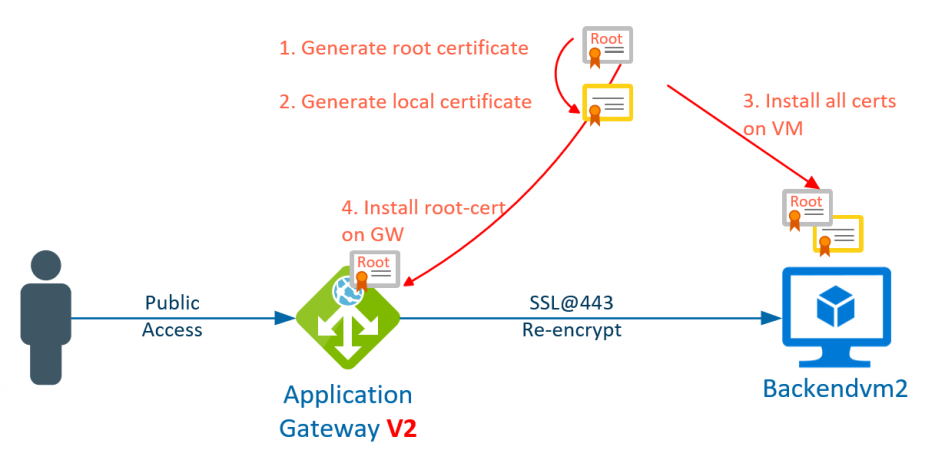
The re-encryption of the back-end data traffic is also different for gateways of type v1 (see post https://blog.zuehlke.cloud/2020/04/configure-backend-re-encryption-at-azure-application-gateway-v1/) than for v2. With v2, the root certificate is stored in the gateway, which was used to generate the certificates of all backend VMs. This greatly increases the management of the backend certificates.
1. Create root certificate
First, the password (key file) for the root certificate is generated in line 1. Then a Certificate Signing Request (CSR) is created in line 2 and information such as email or server name is requested. In line 3 the certificate is generated for 365 days and the generated output is shown in line 4-6 is generated.
openssl ecparam -out rootcert.key -name prime256v1 -genkey
openssl req -new -sha256 -key rootcert.key -out rootcert.csr
openssl x509 -req -sha256 -days 365 -in rootcert.csr -signkey rootcert.key -out rootcert.crt
Signature ok
subject=/C=DE/ST=Some-State/O=thomas example company/CN=www.zuehlke.cloud/emailAddress=thomas@zuehlke.cloud
Getting Private key
2. Create server certificate
Second, the certificate for the backend server should be generated. Lines 1 and 2 are identical to the first step. The FQDN of the server must be specified in the CSR under Common Name. If the server is not part of a domain, its FQDN is <hostname>.internal.cloudapp.net. The specific FQDN can also be determined with the nslookup <IP address>. In line 3, however, a new certificate is created, using the root certificate from step 1.
openssl ecparam -out backendvm2cert.key -name prime256v1 -genkey
openssl req -new -sha256 -key backendvm2cert.key -out backendvm2cert.csr
openssl x509 -req -in backendvm2cert.csr -CA  rootcert.crt -CAkey rootcert.key -CAcreateserial -out backendvm2cert.crt -days 365 -sha256
Signature ok
subject=/C=DE/ST=Some-State/O=thomas company example/CN=backendvm2.internal.cloudapp.net/emailAddress=thomas@zuehlke.cloud
Getting CA Private Key
When checking the generated certificate, the FQDN of the server (line 12) and the reference to the root certificate (line 8) can be checked.
openssl x509 -in backendvm2cert.crt -text -noout
Certificate:
    Data:
        Version: 1 (0x0)
        Serial Number:
            e5:2a:99:76:72:1e:4c:6d
    Signature Algorithm: ecdsa-with-SHA256
        Issuer: C=DE, ST=Some-State, O=thomas example company, CN=www.zuehlke.cloud/emailAddress=thomas@zuehlke.cloud
        Validity
            Not Before: Apr 27 07:26:51 2020 GMT
            Not After : Apr 27 07:26:51 2021 GMT
        Subject: C=DE, ST=Some-State, O=thomas company example, CN=backendvm2.internal.cloudapp.net/emailAddress=thomas@zuehlke.cloud
        Subject Public Key Info:
            Public Key Algorithm: id-ecPublicKey
                Public-Key: (256 bit)
                pub:
                    04:42:09:9b:36:94:1b:f2:a6:49:38:ab:88:e8:fe:
                    5c:50:4f:a5:c0:f2:0b:4b:34:2b:b1:b8:6a:1d:c4:
                    51:38:61:0a:a9:d4:c9:1a:26:27:b9:4d:60:19:e4:
                    71:ca:ee:58:17:83:e9:ce:99:0a:7f:0e:27:23:1a:
                    a4:c0:93:78:63
                ASN1 OID: prime256v1
                NIST CURVE: P-256
    Signature Algorithm: ecdsa-with-SHA256
         30:46:02:21:00:82:ab:3d:ec:7b:db:2c:14:e8:48:ba:75:0a:
         76:ff:bc:31:f3:f6:15:73:cf:a3:b1:1a:55:de:0c:15:2b:e7:
         13:02:21:00:94:f9:84:2d:e8:50:c9:49:29:3b:c9:85:4b:db:
         a0:94:55:94:fc:c1:22:56:d8:88:50:3a:5f:8f:68:94:66:fa
3. Install Certifcates on backend
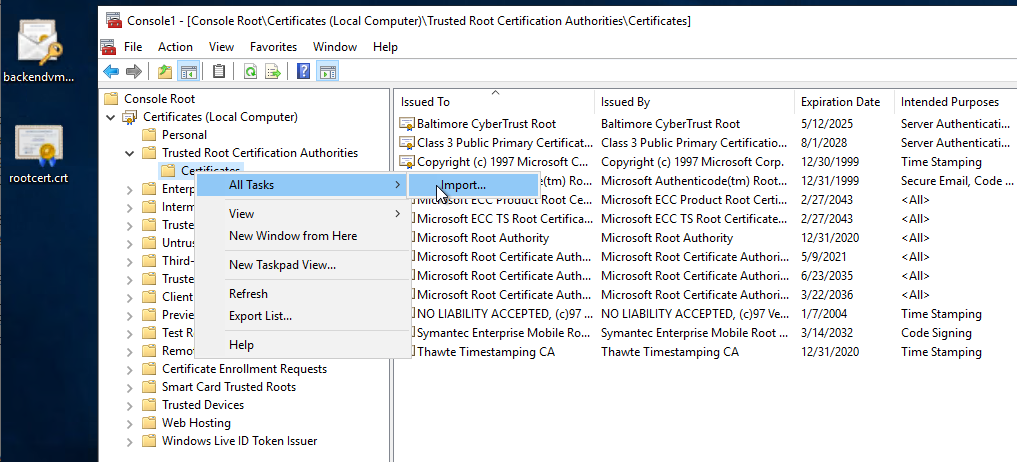
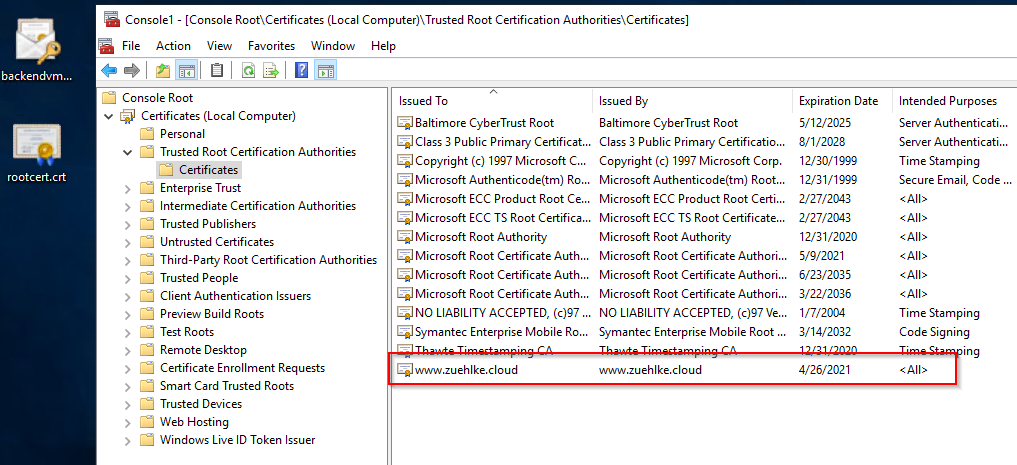
Both certificates (root and server certificate) must be installed on the web server. In this example a Windows Server and the IIS is used.
The root certificate can be imported directly into the Trusted Root Certificates store by using the mmc and the certificate Snap-In:

The easiest way to set up the Server certificate in IIS is to use the import command. To do this, the certificate must be provided as a PFX. The PFX file is generated in line 1. The specified password is used for the later import into the IIS and is independent of the certificate password:
openssl pkcs12 -export -out backendvm2.pfx -inkey backendvm2cert.key -in backendvm2cert.crt -certfile rootcert.crt
Enter Export Password:
Verifying - Enter Export Password:
Afterwards, the PFX can be imported into IIS and configured in the binding of the website:


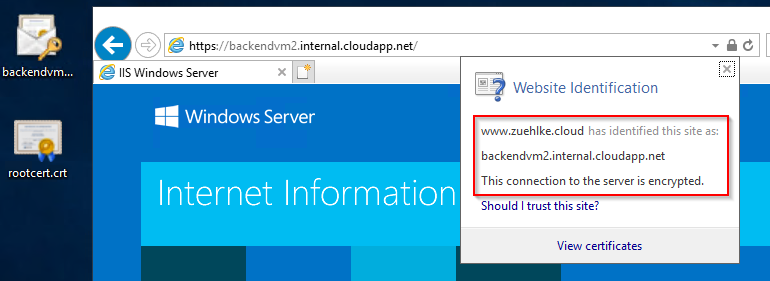
If all certificates are installed correctly, a valid SSL connection is used if the call is made with the FQDN https://backendvm3.internal.cloudapp.net:
4. Configure the Application Gateway
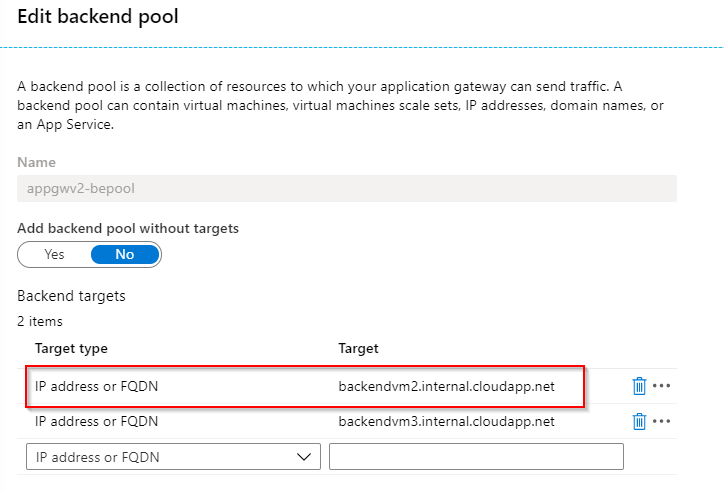
First, the backend pool must be configured in the Application Gateway. Several VMs can be used here. However, the use of FQDNs is also important here:
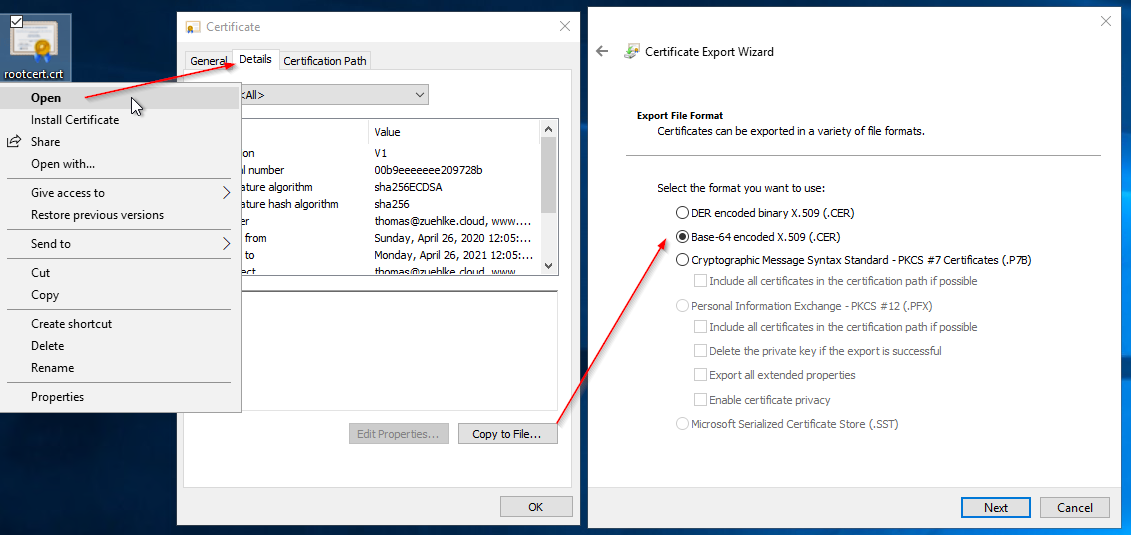
Then the HTTP-settings must be configured. To do this, the root certificate must be stored in the Application Gateway in the CER format. In Windows, the certificate (CRT) can simply be opened and the export as Base64 can be selected, thus generating the CER file:
When configuring the HTTP-settings, the property Pick host name from backend target must be set in addition to the root certificate.


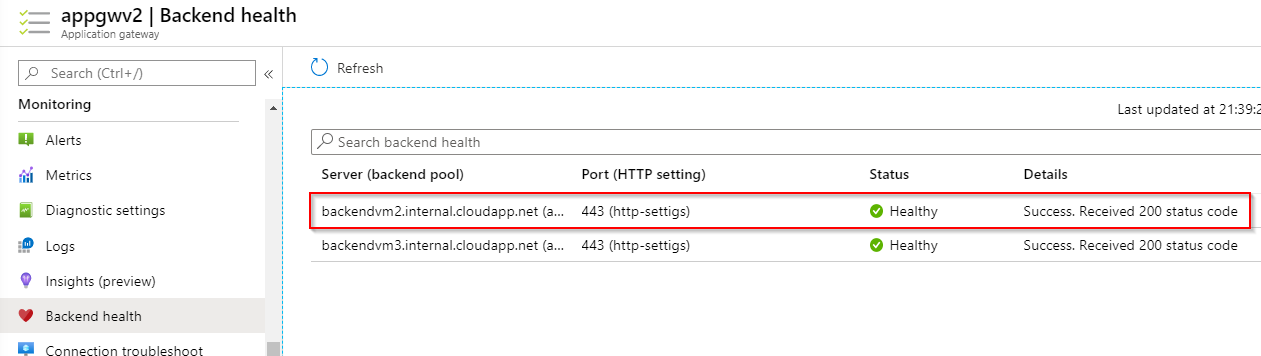
Finally, the health check in the gateway should display the status Healthy under Backend health:
The website can then be reached via the public IP of the Application Gateway. Even if the Application Gateway is called via HTTP, communication with the backend is encrypted.
Schreibe einen Kommentar